New low mileage VX... and pics of my almost finished (bodywork) 92 VX - Page 2 - Fuelly Forums

Click here to see important news regarding the aCar App

Go Back   Fuelly Forums > Fuel Talk > General Fuel Topics
Today's Posts Search Click Here to Login
Reply
 
Thread Tools Display Modes
 
Old 11-10-2011, 04:20 PM   #11
Registered Member
 
Join Date: Mar 2010
Posts: 21
Country: United States
Re: New low mileage VX... and pics of my almost finished (bodywork) 92 VX

Ok, just a little tutorial on block sanding and using guide coat... So the primer is down and dry, and this morning I thought I would run out to the shop for a few minutes before I went to the office and block sand. When you sand there are a few important things you need to keep in mind:

1. ALWAYS use a block (or suitable rigid object for the surface) when sanding. If you don't you run a very high risk of sanding "fingerprints" or grooves into your bodywork. Just because you think that your hand is flat, i can assure you that it isn't. I have been doing this for about 10 years now, and I still don't sand with my bare hand unless absolutely necessary (which is almost never the case). And always use the largest, most rigid block that you can to accomplish the task (please no jokes .

2. ALWAYS use a "guidecoat". A guidecoat is a coat of paint and or graphite like dust that is applied to your filler/primer to help you see surface imperfections while sanding. You can't do a great job without using a guidecoat! Just b/c you can't feel the imperfection doesn't mean it is not there. Now, I can sand a car that is being painted white and get away with no guidecoat... why... b/c white is the most forgiving color to paint a car. It will only show "large" waves or imperfections (large is a relative term). Now I said that I "can" do it, this doesn't mean that I do. I never sand without using a guidecoat. If you are going to use spray paint to lightly spray over the panel, make sure that it is lacquer and not enamel. Lacquer will not clog your sand paper as you sand, enamel has a tendancy to clog especially if you are dry sanding.

3. When you breakthrough to metal while sanding in an area...STOP! This means that the area is higher than the surrounding metal. It would only make the surrounding areas lower to continue sanding so this is your time to move to another location.

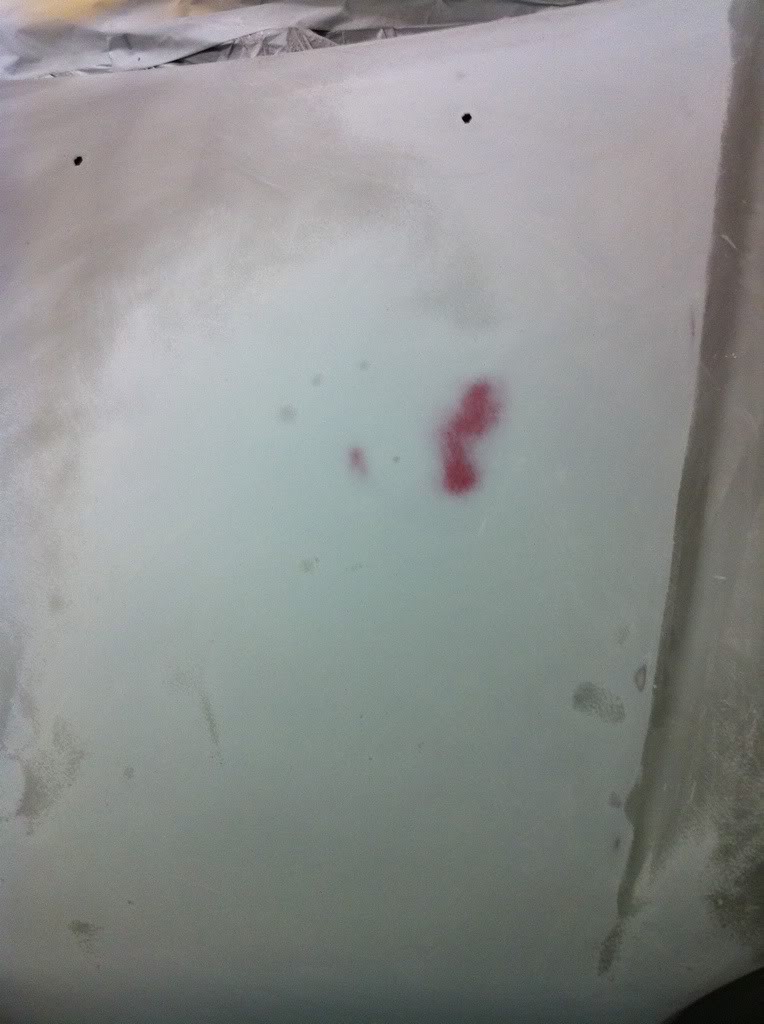
Here's a few pics of what a round of sanding looks like...

Here you can see that I have "guidecoated" the entire hood, and started to sand one side of it. When I started the whole hood was uniformly covered in the black guidecoat. I use a dry 3m guidecoat powder that they sell. It is EXPENSIVE, but it's great and worth it to me. It can be sanded wet or dry. In the pic you can see a red spot where I broke through the primer down to the original paint, that's fine. You can also see a few small black marks in the midst of sanded primer. These are low spots that need to be addressed before moving on.


I will show you a closer up photo of a few of these


__________________

coletrain777 is offline   Reply With Quote
Old 11-10-2011, 04:20 PM   #12
Registered Member
 
Join Date: Mar 2010
Posts: 21
Country: United States
Re: New low mileage VX... and pics of my almost finished (bodywork) 92 VX

In the first of the "close-up" pics if you look to the lower left of the red, you will see a larger "low" and to the right of it there is a spot of shiny metal. This is what I am talking about when I say stop. If I were to continue to sand I could get rid of the low spot, but I would sand much of the surrounding primer away in effect making the metal spot higher than it already is. This would accomplish nothing other than making more work for myself. This lowspot needs to be filled with a 2 part glazing filler. This glazing filler is just like regular fill except thinner and easier to sand. It shouldn't be applied any thicker than 1/32 of an inch (this low spot looks bad but I almost can't feel it).

In the second close-up pic you will see an area that has a larger low, then two small spot. This area will come out with increased sanding (unless I break through to metal first), b/c the imperfections are likely not as deep as the primer.

In the third pic you will see a tiny low in between two patches of red. This spot is best left and filled with glazing filler even though there is no metal showing (yet). This is because I am down to the original basecoat and it is extemely thin. I might make a few more sanding strokes and the spot would go away, but I will probably break through to the underlying metal, so I will just leave it.

It is OK to break through to metal and filler at this point, and in fact you should be doing that in places (if you're not, you're probably not sanding enough to make the panel "flat"). There is nothing done at this stage that can be disastrous, but don't rush the process. Do it the right way, and it will take less time and money in the long run
__________________

coletrain777 is offline   Reply With Quote
Old 11-10-2011, 04:24 PM   #13
Registered Member
 
Join Date: Mar 2010
Posts: 21
Country: United States
Re: New low mileage VX... and pics of my almost finished (bodywork) 92 VX

Will post more pics tommorow... am almost done with this round of blocking. Next I have to "glaze" the few remaining imperfections, then its time for 2-3 coats of 2K urethane primer. Block that with 320,600 and COLOR! Hope to spray color by the middle of next week???
__________________

coletrain777 is offline   Reply With Quote
Reply


Posting Rules
You may not post new threads
You may not post replies
You may not post attachments
You may not edit your posts

BB code is On
Smilies are On
[IMG] code is On
HTML code is Off
Trackbacks are Off
Pingbacks are Off
Refbacks are Off


Similar Threads
Thread Thread Starter Forum Replies Last Post
Vortex Generators / Hmmm Airtabs zpiloto Experiments, Modifications and DIY 92 02-09-2007 07:26 PM

Powered by vBadvanced CMPS v3.2.3


All times are GMT -8. The time now is 04:16 PM.


Powered by vBulletin® Version 3.8.8 Beta 1
Copyright ©2000 - 2024, vBulletin Solutions, Inc.