Aerotrunk project - Fuelly Forums

Click here to see important news regarding the aCar App

Go Back   Fuelly Forums > Fuel Talk > Motorcycles
Today's Posts Search Click Here to Login
Reply
 
Thread Tools Display Modes
 
Old 10-08-2013, 11:28 AM   #1
Registered Member
 
low&slow's Avatar
 
Join Date: May 2008
Location: Livermore CA
Posts: 151
Aerotrunk project

Vetter Challengers seek to develop vehicles that get over 100mpg, can go over 70 mph into a 30 mph headwind and can carry 4 full paper grocery bags on board. My streamlined 1999 Ninja 250 can easily do this. (For more information on the Vetter Challenge check out motorcycle designer Craig Vetter's website at Craig Vetter, designer and inventor of the Windjammer fairing,Triumph Hurricane Motorcycle and fuel economy motorcycles )
But streamlined motorcycles aren't for everyone so in my pursuit to show how to make motorcycles more efficient and useful I decided to work on another, less radical project. I decided to limit my modifications to a few simple tweaks and see if I meets the goals of the Vetter Challenge with my 2005 Ninjette.

I started by raising the gearing from stock by installing a 15T countersprocket and a 41T rear sprocket ( vs 14/45). It has been my experience that the Ninjette can handle up to 15/37 pretty well. I then made a taller windscreen and fully faired in my front wheel. Now I was ready to make a detachable trunk that would further reduce my aerodynamic drag and give me lots of cargo capacity.

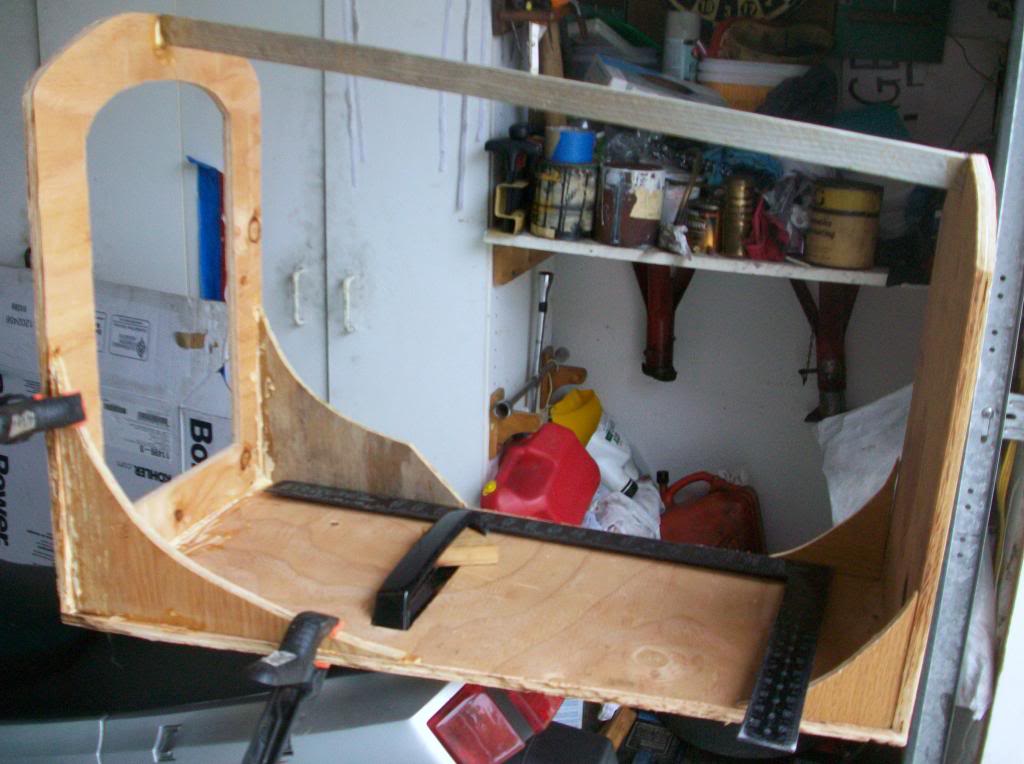
First I cut out a 1/2" plywood base with slot for the rear grab handle to pass through that the aerotrunk can be clamped down by pushin some slats of right size to force the base down tight. I decided on a 29" for the length. The width was 16", a bit less than my shoulder width. The front bulhead is just under my seated shouder height at ~ 18" at the sides and arching up to 21" at the center. The rear bulkhead narrow down to 12" wide, 14.5" at the sides and arching up to 15" in the center. I then cut a loading opening in the front bulkhead 10" wide x 15" high. If you decide to make your own aerotrunk make so that it is just shorter and narrower than your torso as you seat on the bike. If it sticks out past your body profile it will likely increase the air drag rather reduce it.

After attaching the front and rear bulkheads to the base with glue and screws, I skinned the aerotrunk sides with some very thin plywood veneer (~1/8", commonly called doorskin"). For the curved top I installed a wooden lath for a central spine. Then I hot-glued some treated sign paper to the spine and the top of the sides as a form for a layer of fiberglass. After glassing the top, I used some fiberglass strips to seal and reinforce the edges. Then I painted it and mounted on my bike using the inner wood slat clamps a long bungee cord hooked on the lower edges of the front loading opening, passing around around the foldout hooks at the seat sides.

The aerotrunk easily holds over 3 full paper grocery bags ( probably could stuff in 4 ). I made a cover for the front opening out of some coroplast. Initial testing shows I'need to refine the inner clamp so that bouncing doesn't make the them come loose. Fortunately the bungee cord backup is very secure.

I'll test out these mods soon and report how it does fuel economy wise. Previously I've done around 80mpg on my 100+ mile testing loop before the mods. [/URL][/IMG]
__________________

low&slow is offline   Reply With Quote
Old 11-07-2013, 04:40 PM   #2
Registered Member
 
low&slow's Avatar
 
Join Date: May 2008
Location: Livermore CA
Posts: 151
I refueled today after hitting the reserve position; I went 362.8 miles and need 3.99 gallons to top off the tank for 90.9 mpg. Not bad, I did one longer trip and the rest was just running errands. I did close up the gap between between the front of the aerotrunk and my back by adding some stryofoam padding. I also added a brake light as the aerotrunk partially blocks it.
__________________

low&slow is offline   Reply With Quote
Old 02-06-2014, 08:44 AM   #3
Registered Member
 
Join Date: Jan 2014
Posts: 6
Country: United Kingdom
Very interesting results. I will try something similar on my BMW RT1150 and post the outcome. Kind regards tw
tonywoodbhf is offline   Reply With Quote
Old 03-01-2014, 03:29 PM   #4
Registered Member
 
low&slow's Avatar
 
Join Date: May 2008
Location: Livermore CA
Posts: 151
Thanks Tony! Here is a picture of the current configuration. My last tankfill produced 96mpg.
low&slow is offline   Reply With Quote
Old 03-02-2014, 01:55 AM   #5
Registered Member
 
Join Date: Jan 2014
Posts: 6
Country: United Kingdom
Hi! That's impressive performance.

The front wheel fairing is similar to the BMW K1 which has a different plan form (once I have worked out how to upload photos, I can show you what it looks like).

Looking at all the Vetter challenge pictures, a lot of work seems to go into the profile of the tail fairing (again more images once I've learned the ropes).

My one reservation in trialling changes on the road was the safety aspect, but bungee attachment is a suitable short term solution.

What's it like mounting and dismounting?

I'm currently going through my archive of consumption data to do a before and after final drive ratio change on my RT.

Kind regards tw
tonywoodbhf is offline   Reply With Quote
Old 03-02-2014, 08:44 AM   #6
Registered Member
 
low&slow's Avatar
 
Join Date: May 2008
Location: Livermore CA
Posts: 151
Thanks Tony! I've seen the BMW K1 which I believe had one of the best Cd of any mass produced moto. Beautiful bike!

The aerotrunk is primarily secured by clamping the passenger grabrail through a slot in the base of the aerotrunk with 2 wooden slats. I use the bungee cord to additionally secure it in the unlikely event that the slats came out of the grabrail. Its very secure and I have ridden with it for hundreds of miles at relatively high speed ( 70-85 mph). I added an additinal brake light to the back of the serotrunk as it partially blocks the view of the stock taillight. The mounting is pretty quick: place aerotrunk base slot over the passenger grabrail, slide in 2 slats to clamp it down, plug in the brakelight wiring, loop the bungee cord over the front pair of hooks, done.

Getting taller gearing on a shaft moto is tough. I used to have a shaft drive Yamaha Vision that I installed taller tires on to reduce my cruising rpms. I got above a 5% improvement.
low&slow is offline   Reply With Quote
Old 03-02-2014, 01:59 PM   #7
Registered Member
 
Join Date: Jan 2014
Posts: 6
Country: United Kingdom
K1

The K1 front fender does a good job of improving front airflow, but I think the aerodynamics of the rest of the bike is optimised to work for a slim rider wearing racing leathers.

I've done 700 miles on one but averaged only 54mpg UK with a best of 64 cruising at 60mph: a full racing crouch is difficult when you're wearing winter riding gear and a rucksack.

tw
Attached Thumbnails
Click image for larger version

Name:	Front.jpg
Views:	274
Size:	43.0 KB
ID:	1567  
tonywoodbhf is offline   Reply With Quote
Old 03-13-2014, 06:37 PM   #8
Registered Member
 
low&slow's Avatar
 
Join Date: May 2008
Location: Livermore CA
Posts: 151
I still need to do the A-B-A testing to define the exact benefit of riding with the aerotrunk but in the interum I'll be comparing the difference between with aerotrunk and not. Today I refilled after traveling 106.9 miles, using .957 gallons for a result of 111.7 mpg. This is the best tankfill so far with this moto's current configuration ( 15/37 gearing, enclosed front fender, aero windscreen and the aerotrunk ). I'm done with modifications for a while so I'll just ride with aerotrunk off and see what the difference is.
low&slow is offline   Reply With Quote
Old 03-14-2014, 09:20 AM   #9
Registered Member
 
Join Date: Jan 2014
Posts: 6
Country: United Kingdom
Good to hear progress: ABA testing implies technical awareness.

I have a large archive of consumption data for my RT.

I was going to try some coast-down tests as a way of getting a rapid feedback on the effectiveness of the device.

Currently waiting for key materials to progress my pet project. Current lead time is 3 weeks.

Watch this space.

Kind regards tw
tonywoodbhf is offline   Reply With Quote
Old 03-20-2014, 03:27 PM   #10
Registered Member
 
low&slow's Avatar
 
Join Date: May 2008
Location: Livermore CA
Posts: 151
I did a ride today with a buddy into the Delta ( aerotrunk removed) and topped off after getting back: 113.7 miles/1.549 gal.= 73.4 mpg . There were a lot of hills and the pace was somewhat spirited but it does seem to show a marked difference without the aerotrunk. I may run another short tank to see what it does during more normal conditions. I think my worst tankfill with the aerotrunk on was around 85 mpg so compared with this one ( 73 mpg) it shows a difference of about 16%. More testing to follow.
__________________

low&slow is offline   Reply With Quote
Reply


Posting Rules
You may not post new threads
You may not post replies
You may not post attachments
You may not edit your posts

BB code is On
Smilies are On
[IMG] code is On
HTML code is Off
Trackbacks are Off
Pingbacks are Off
Refbacks are Off


Similar Threads
Thread Thread Starter Forum Replies Last Post
91 crx hf irollint General Fuel Topics 12 02-12-2013 07:04 AM
higher Octane = Better MPG JBW General Fuel Topics 9 04-03-2012 11:54 PM
175/70-13 winter tires found on craigslist theholycow For Sale 0 09-17-2011 04:50 AM
Anyone hypermile a BMW? JESSE69 Hypermiling 9 06-27-2008 11:29 PM
Rear deflector...posible mpg gains? ZugyNA Aerodynamics 6 01-10-2008 01:40 PM

» Fuelly Android Apps
Powered by vBadvanced CMPS v3.2.3


All times are GMT -8. The time now is 05:26 AM.


Powered by vBulletin® Version 3.8.8 Beta 1
Copyright ©2000 - 2024, vBulletin Solutions, Inc.